The International Commons room, UCC 1117, will comfortably seat 80 theater-style and 32 classroom-style. The room has three projectors, three screens, and three whiteboards. Access to the main corridor, kitchen, and restrooms are programmed simultaneously.
Only groups with a UI affiliation will be allowed to use the room. UI student groups have been asked to go through IMU for their space needs. UI credit courses need to be scheduled through Classroom Scheduling. The room is not available to departments outside of International Programs on weekends. IP units will take priority over non-IP units in reserving this space. In special circumstances, your reservation may need to be declined after the original acceptance.
The host is responsible for assuring that the conduct of all participants at events held in University buildings conforms to University policies.
Users are responsible for leaving the area clean and orderly. The clean-up must be done immediately after the event is over unless special arrangements have been made in advance. The host group and the sponsoring unit will be held responsible for any loss or damage that occurs during use. Such loss or damage must be promptly reported to Amy Green. Report property damage or theft immediately to the Department of Public Safety at 911 or 319-335-5022.
Reservations & Questions

Amy Green
Reserving UCC 1117
After academic year reservations for the units within International Programs are complete, reservations for other departments and colleges may be requested through the Microsoft Outlook Calendar. Look for the room availability at RES-UCC-IP-1117@uiowa.edu.
- Open an appointment on your Outlook calendar. Click on the “SUBJECT” line and note the event that the room is being requested for: i.e. “Global Access Ambassador Meeting”.
- “Invite Attendees” (center of ribbon). The message should be directed to the room for which the reservation is being requested: RES-UCC-IP-1117@uiowa.edu
- Enter the date and time for which the room is needed. Time should include 1 hour for set up and 1 hour to clean up and arrange the tables and chairs back to the default layout.
- In the textbox of the invitation, include:
- the name of the UI department or group making the reservation
- the name and contact information for the UI employee who will be staffing the event
- MFK for custodial services or damages
- expected number of attendees
- the nature of the event
- and any special accommodations needed for the event
- In addition, include any relevant information that might be useful for the IP receptionist when answering questions regarding the event and in directing visitors
- Click the “Send” icon.
- You will receive a confirmation of the acceptance or decline of your request via email (not immediately). Your reservation is not confirmed until you receive such email.
If you need to make changes to a reservation that has been accepted, please edit the calendar invite and send the updates. If you cannot find the calendar invite, please contact Amy Green to make changes to a current reservation.
- The default layout for the room is set up classroom style with tables (12) and chairs (24) and the side next to the windows has a large conference table (6) with chairs (12).
- You may rearrange the furniture as needed, just place them back in the default when you are done.
- Additional tables and chairs are in the storage closet in the room. The storage closet holds 4 five-foot tables and 5 four-foot tables and 35 chairs without arms.
- No furniture should be moved into or out of the Commons area.
- Tacks, push pins, nails, duct tape or scotch tape may not be used to put up decorations, only blue masking tape and string may be used. Decorations should be removed immediately after the event is over.
Following your event, please rearrange the room back to the default layout.
- All chairs left out on the floor should have arms.
Chairs without arms are to be neatly stacked (7 high) and placed at the side of the room by the windows or in the storage closet if removed from there. - Decorations should be removed immediately after the event is over.
- If you plan to serve food or drinks at your event:
- Wipe off all tables and chairs.
- Vacuum the floor at the end of your event.
- A vacuum is available in the storage closet.
- Cleaning supplies are in the kitchen
- Custodial services may be hired, at the expense of the group, to provide cleaning.
- Advance notice is required for custodial services to accommodate any cleaning request.
If you serve food or drinks at your event:
- Wipe off all tables and chairs.
- Cleaning supplies are in the kitchen
- Vacuum the floor at the end of your event.
- A vacuum is available in the storage closet.
Custodial services may be hired, at the expense of the group, to provide cleaning.
Advance notice is required for custodial services to accommodate any cleaning request.
The room temperature is set centrally by Facilities Management.
- If the room temperature is excessive, contact FM Work Control at 5-5071.
- If you need to prop a door open:
- Prop one of the two exit doors (Doors B or C).
- Do not prop open the door with the Automatic Opener (Door A) as it is not meant to stay open and will potentially break the opener.
- Any damages will be charged to the group using the room.
Default Layout

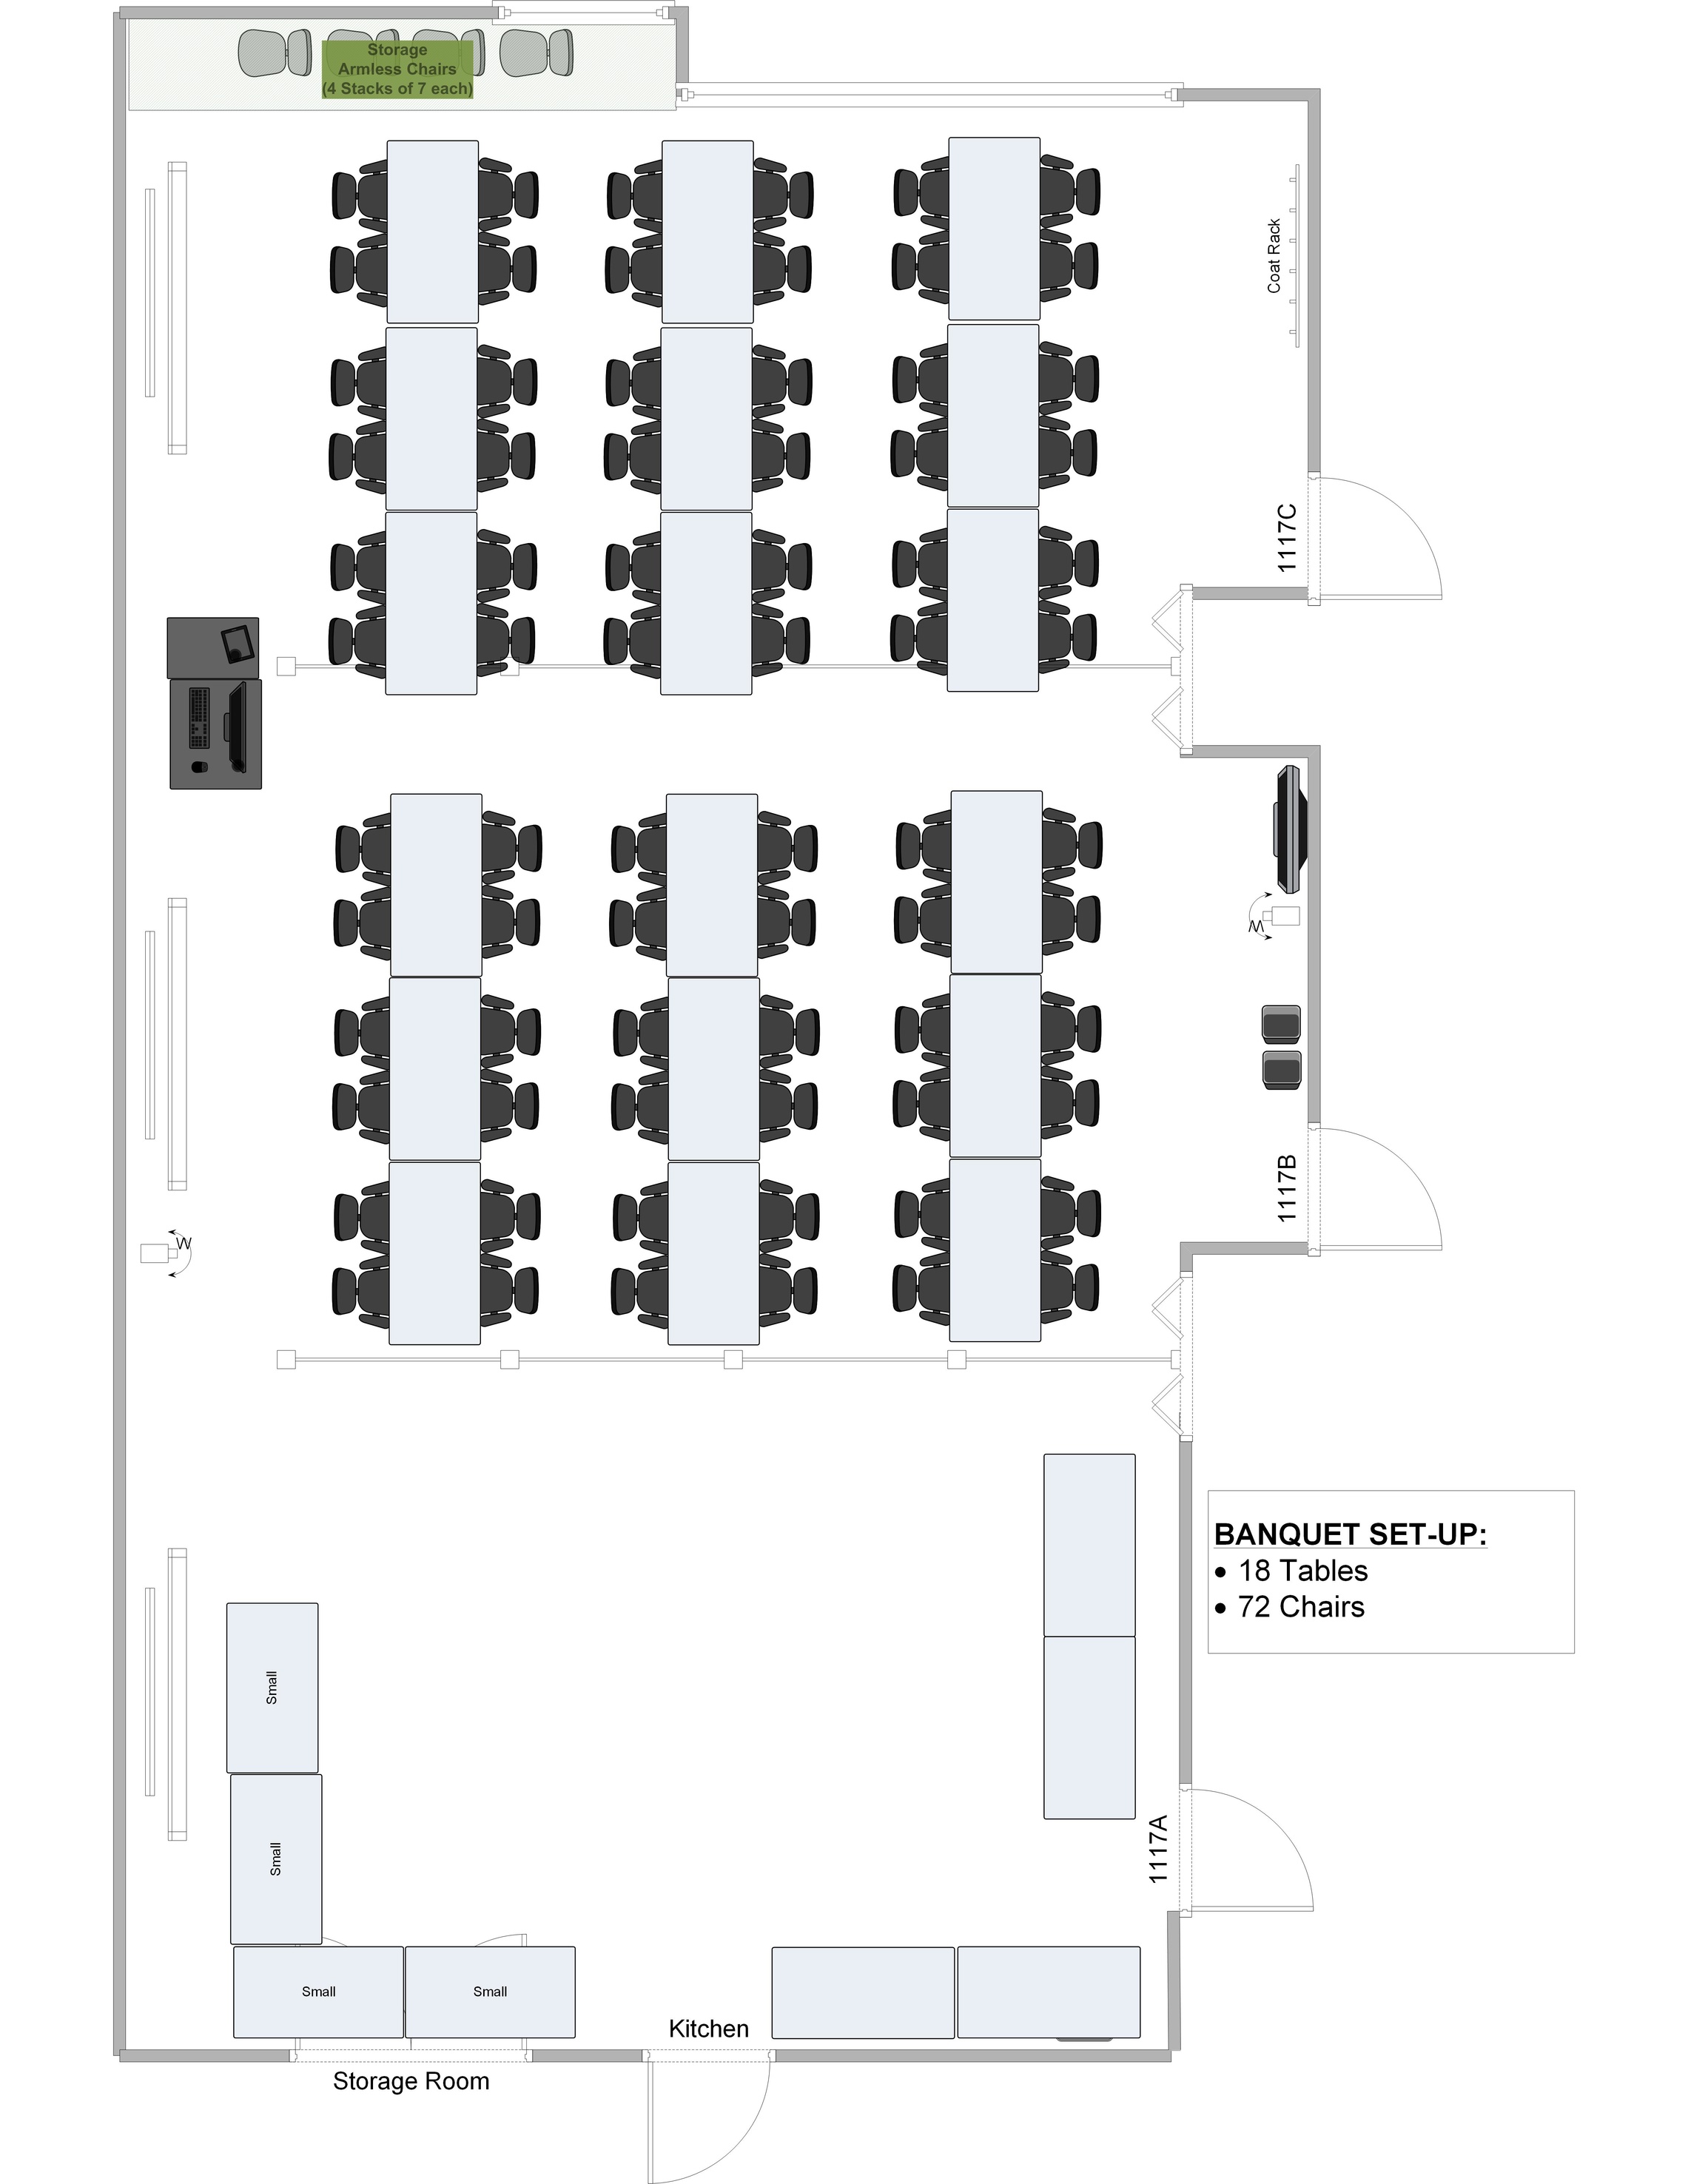
Banquet Layout
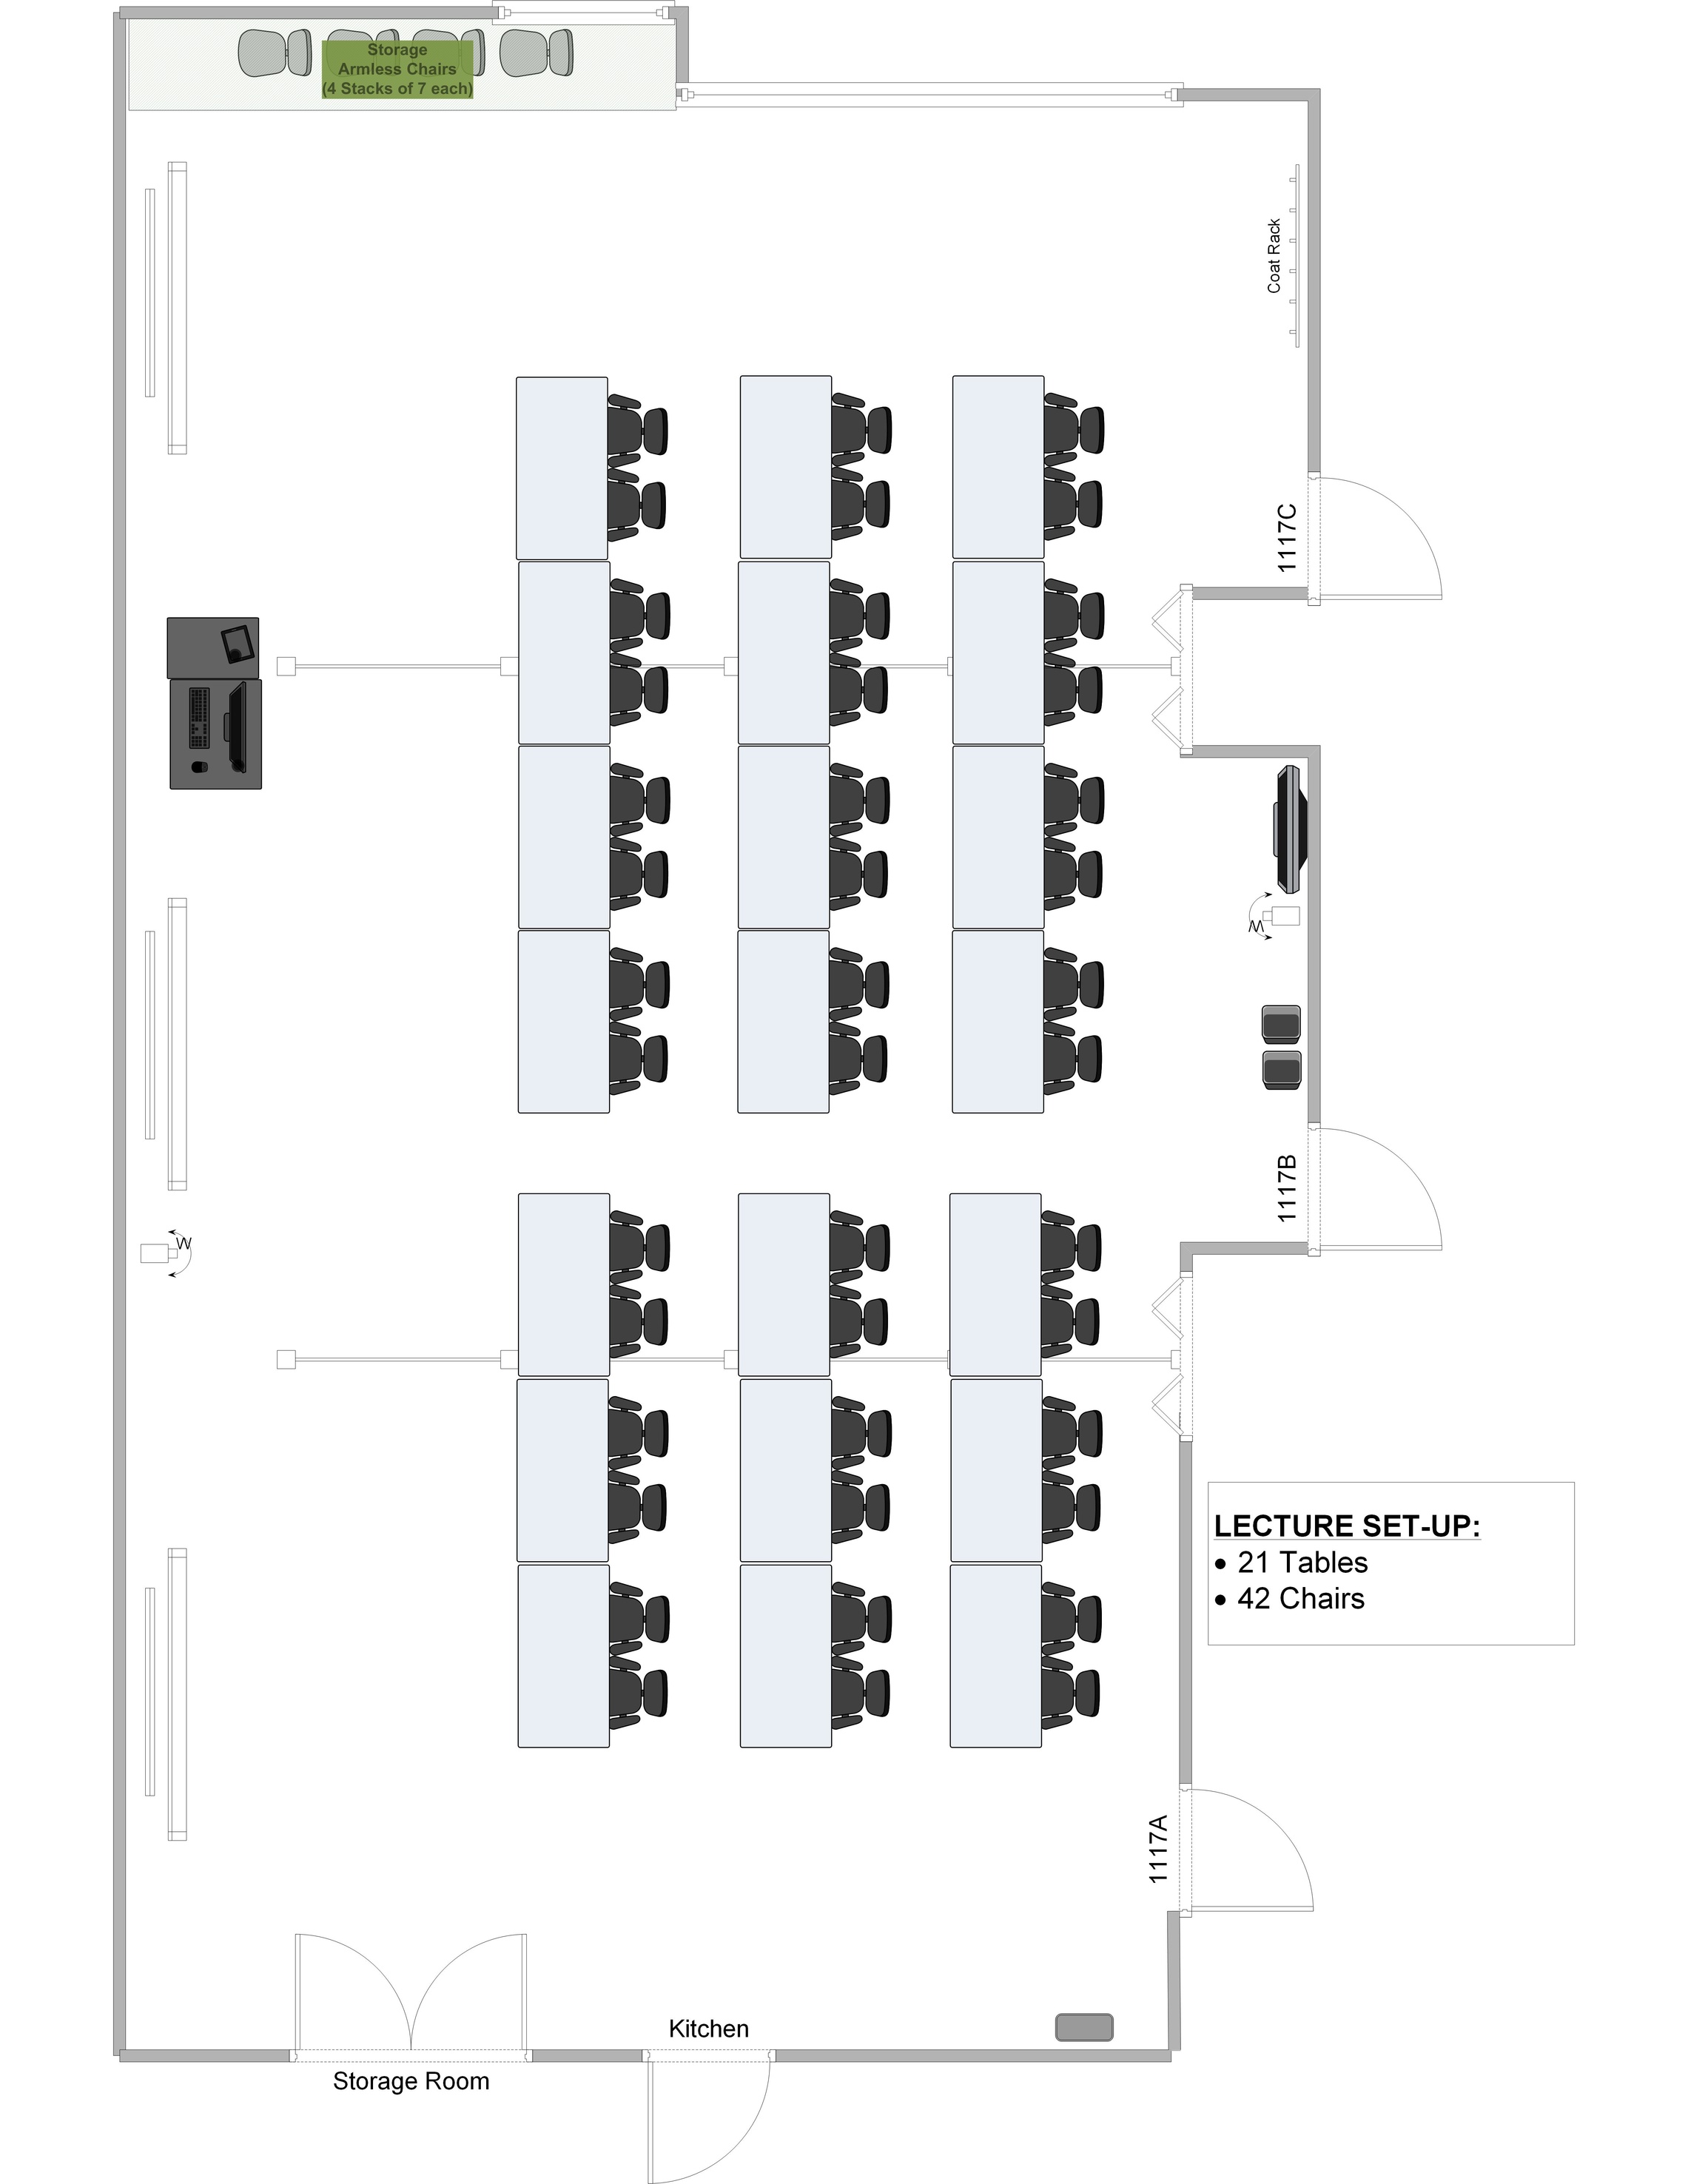
Lecture Layout
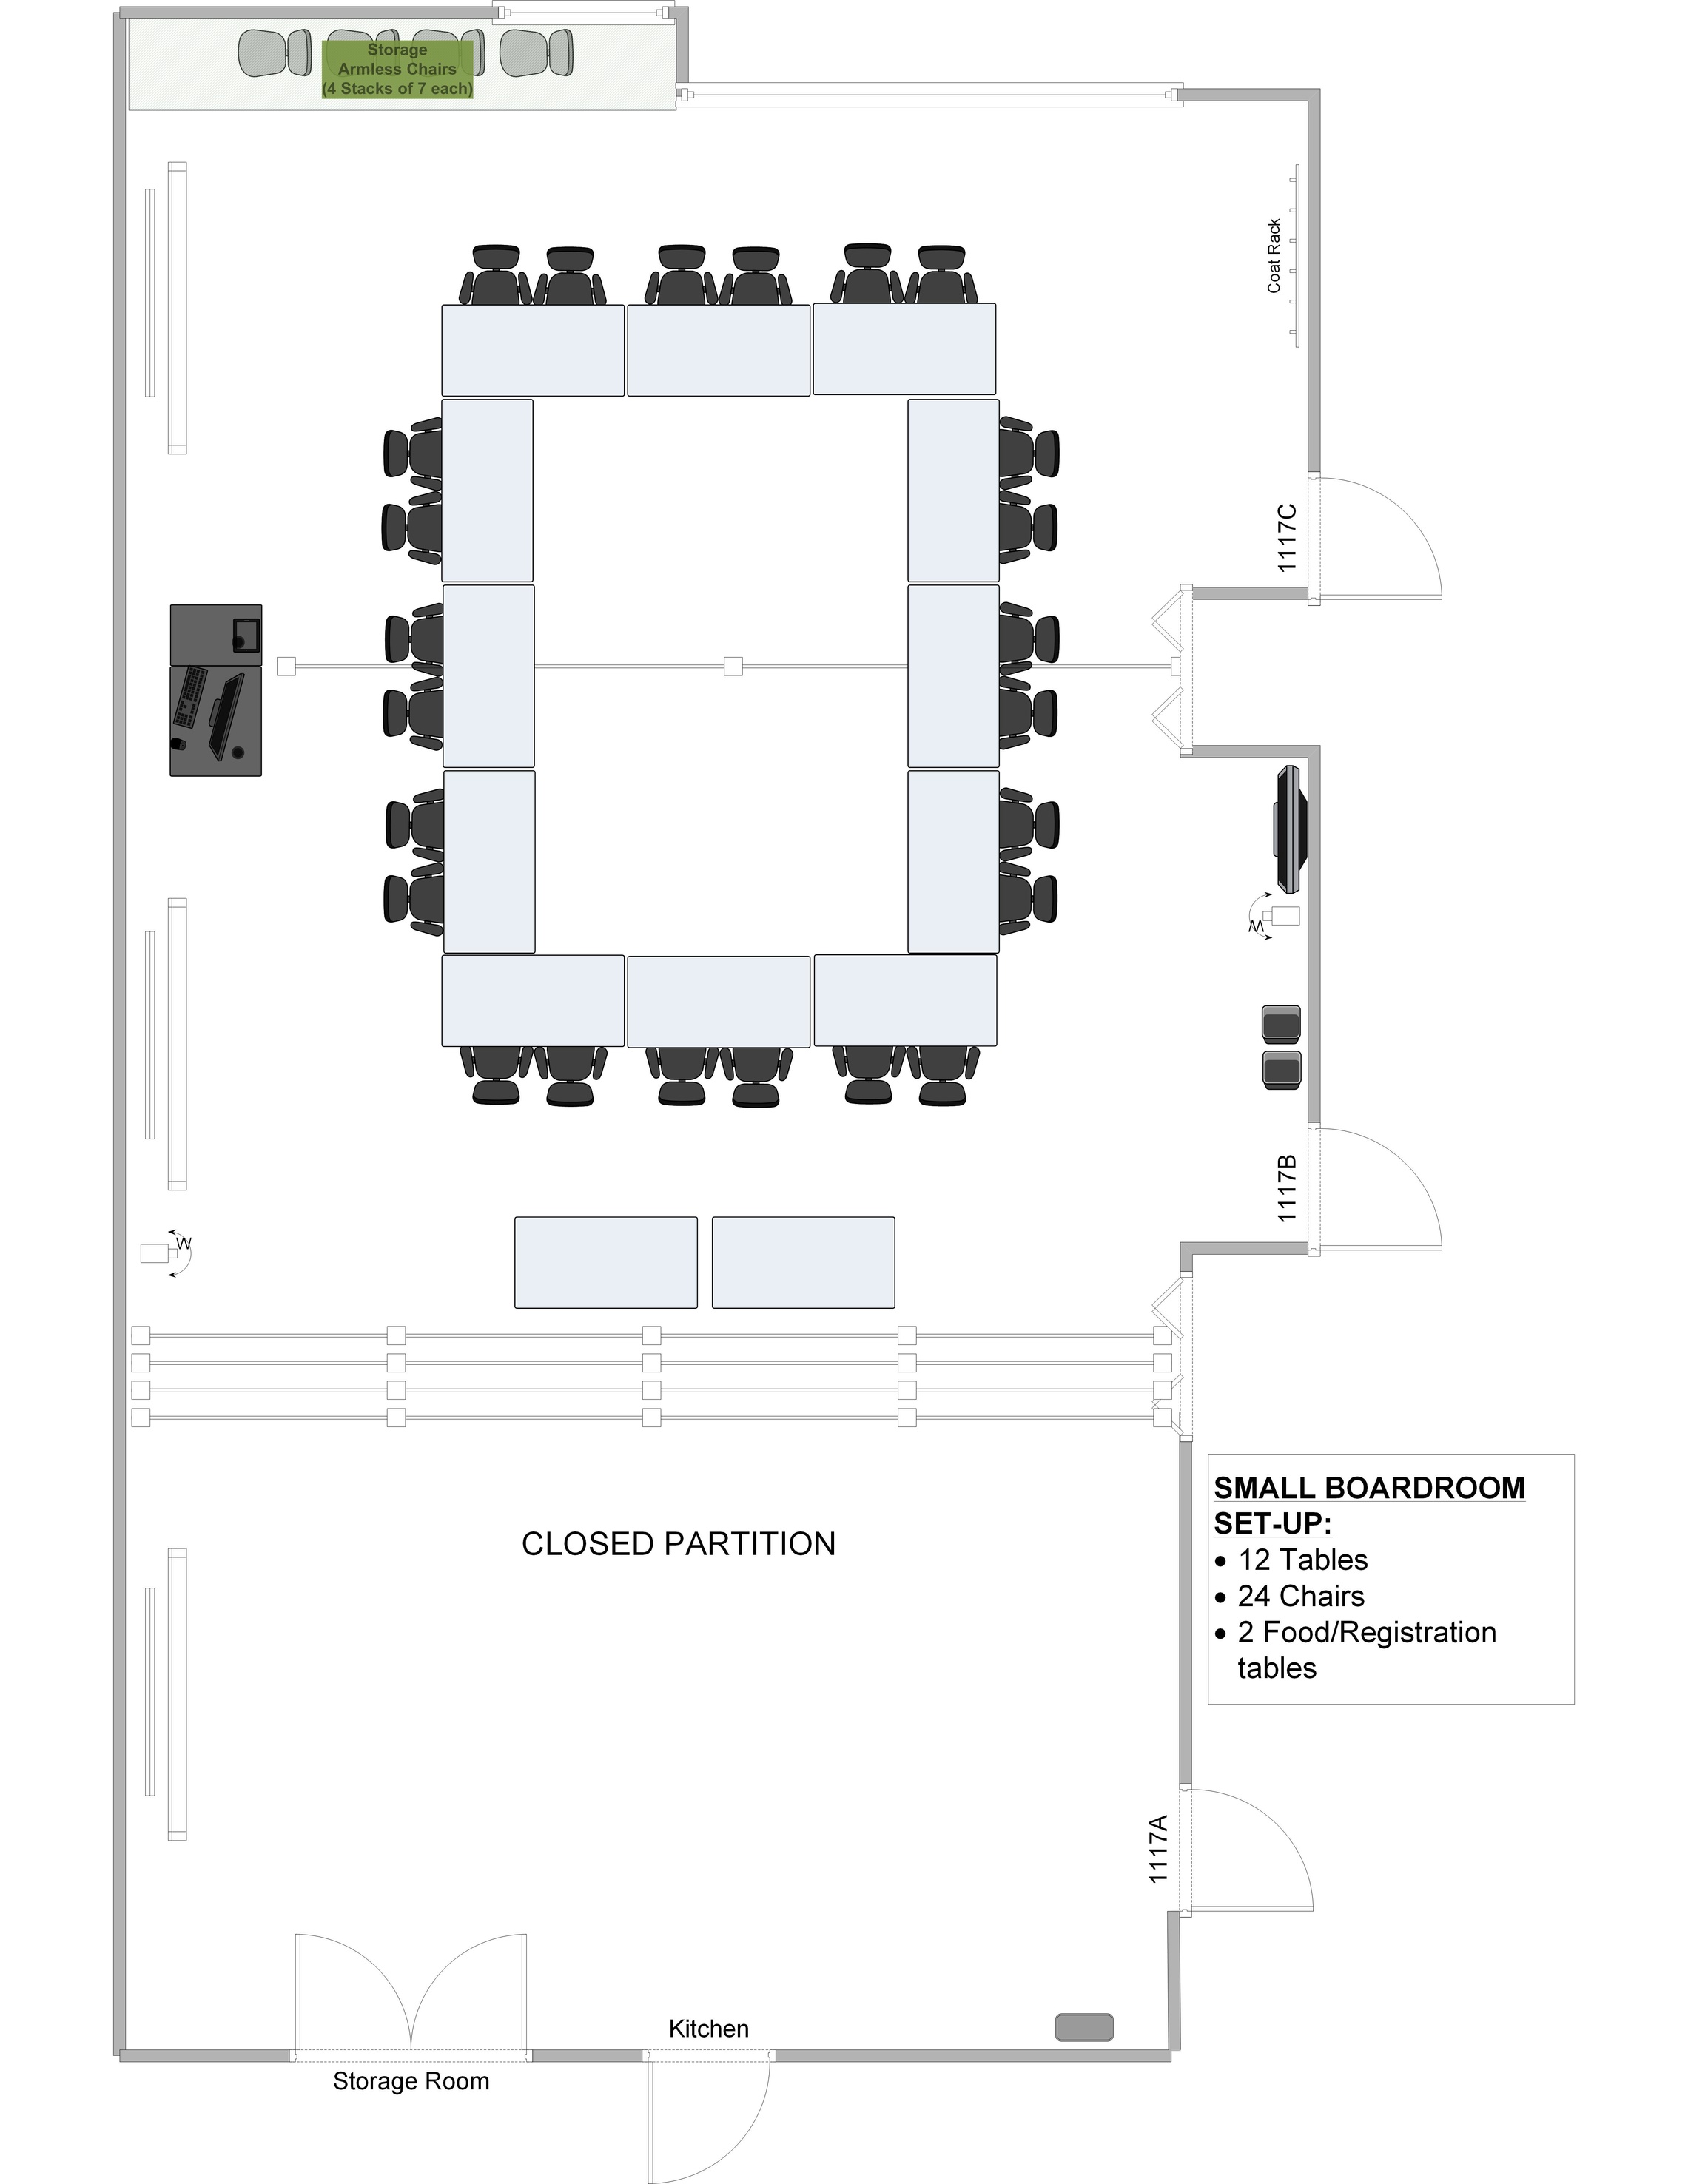
Small Group Layout
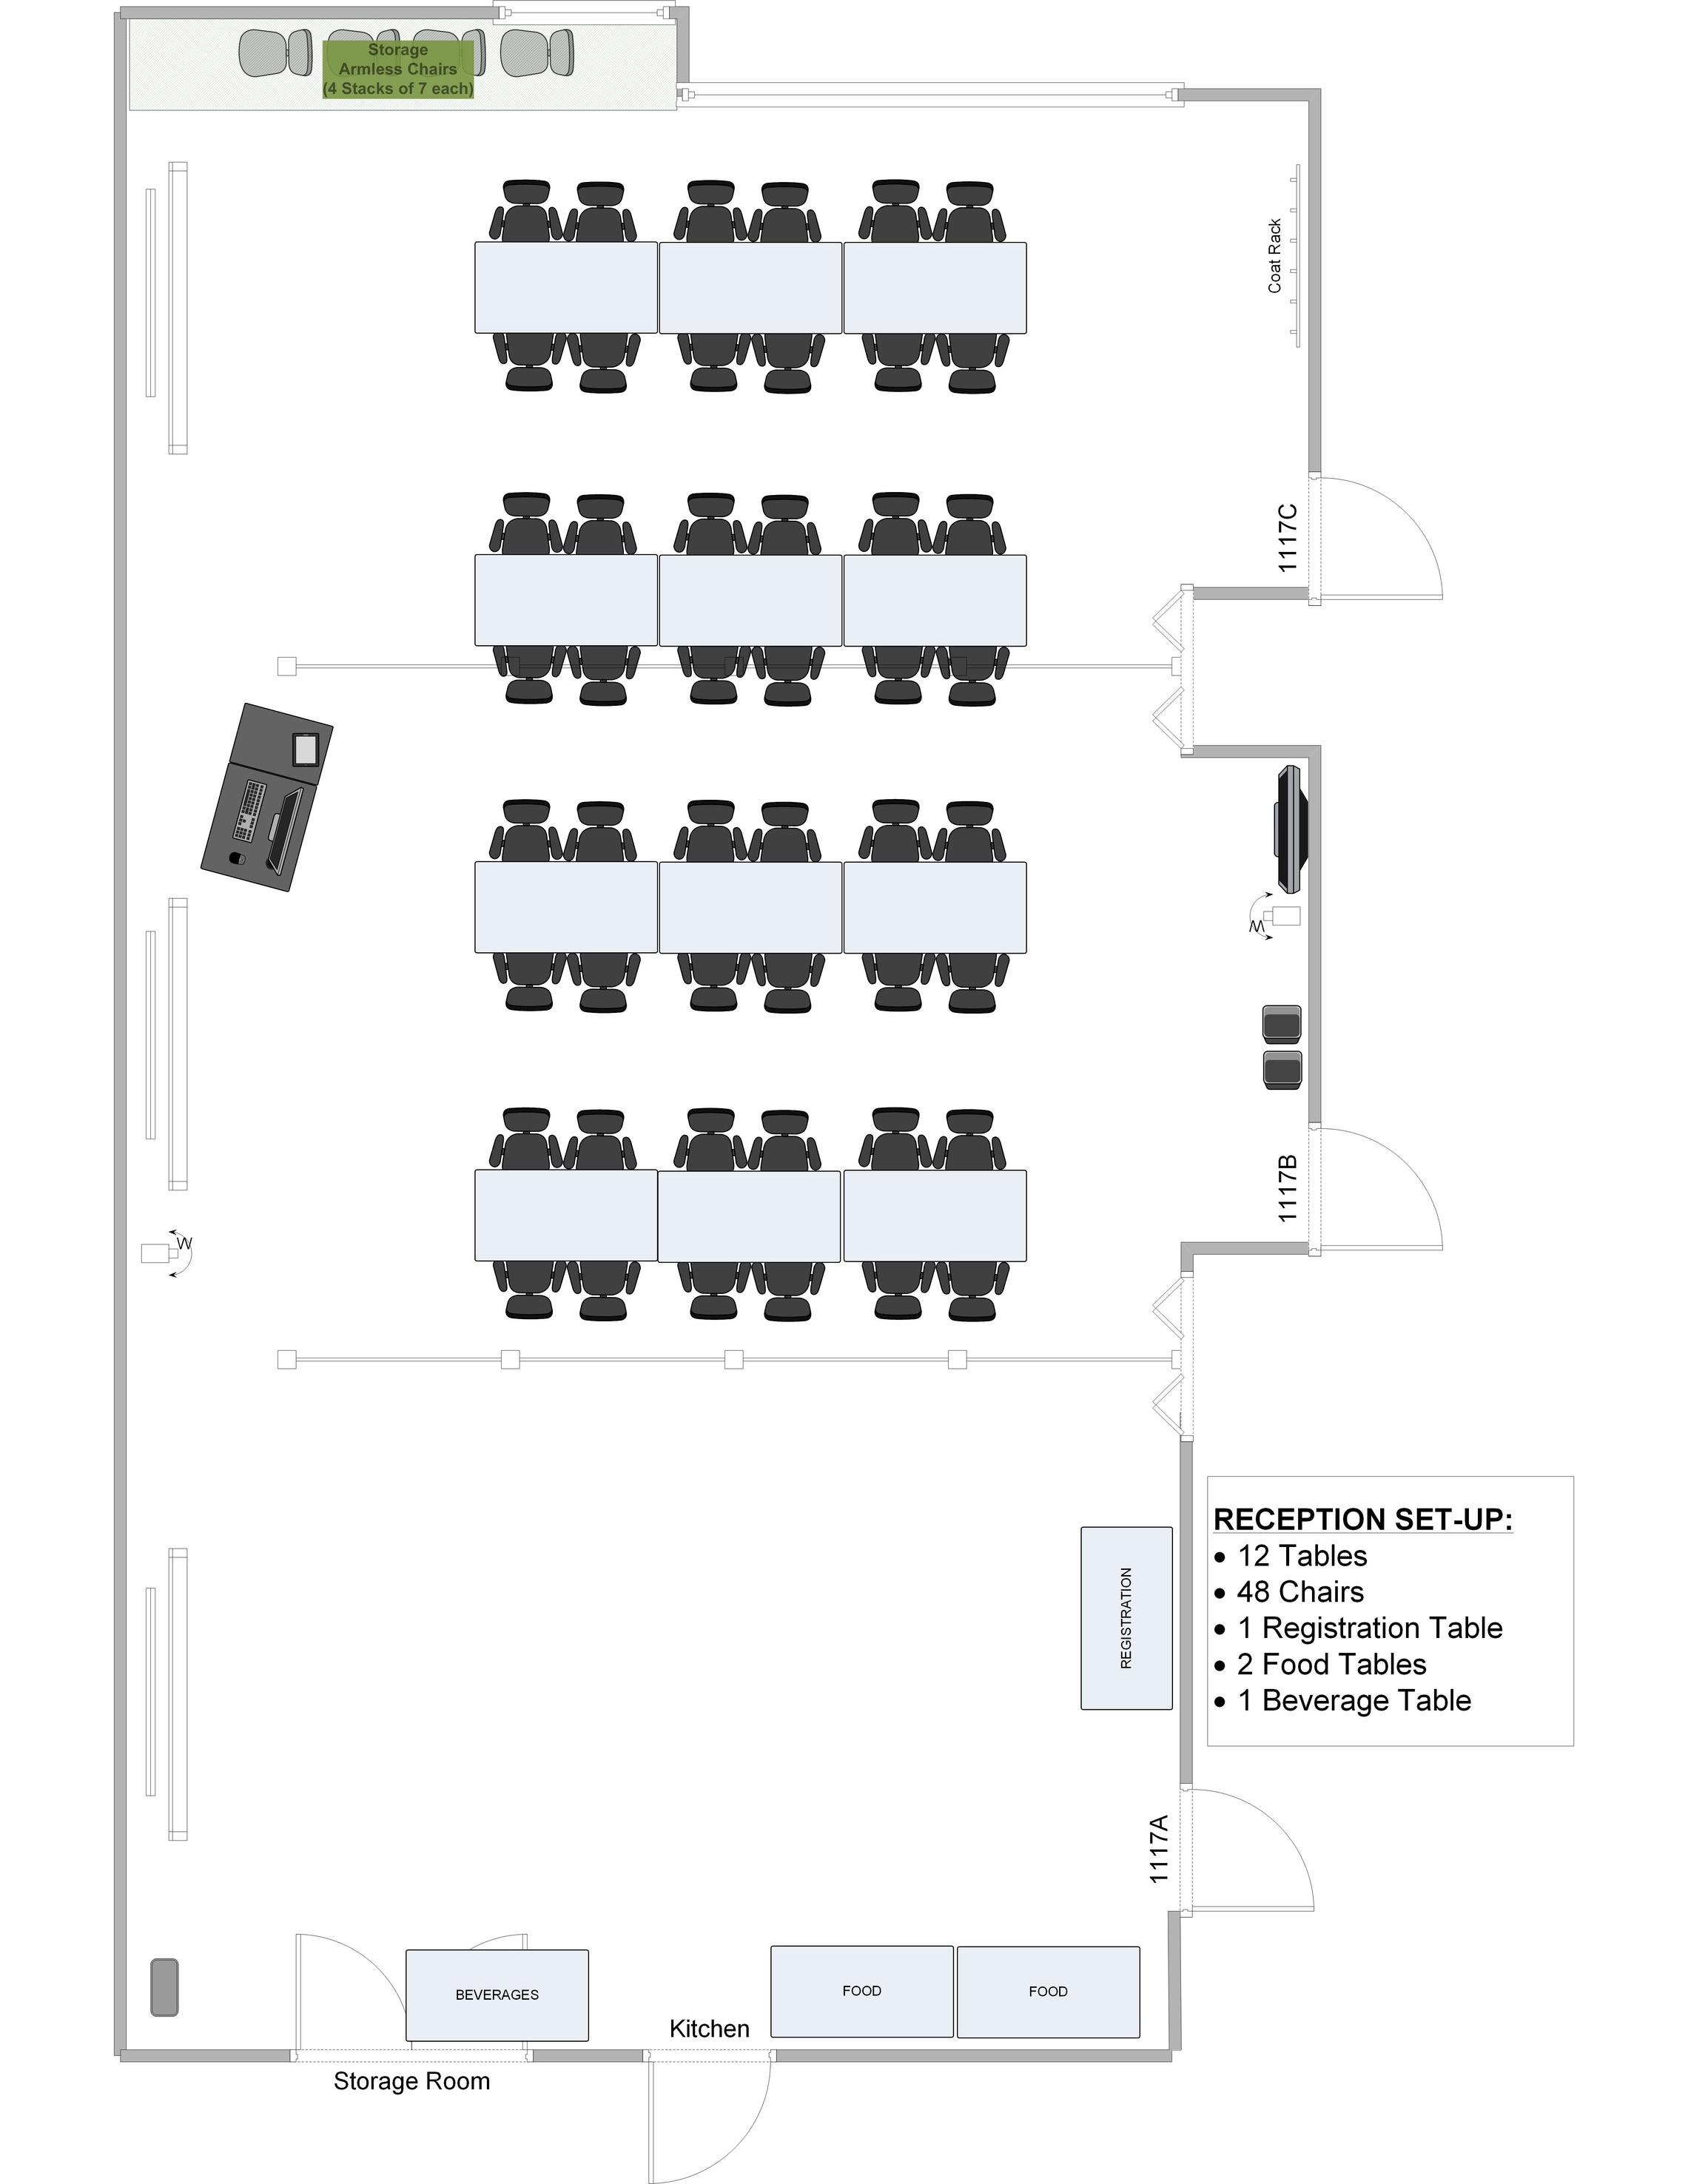
Reception Layout
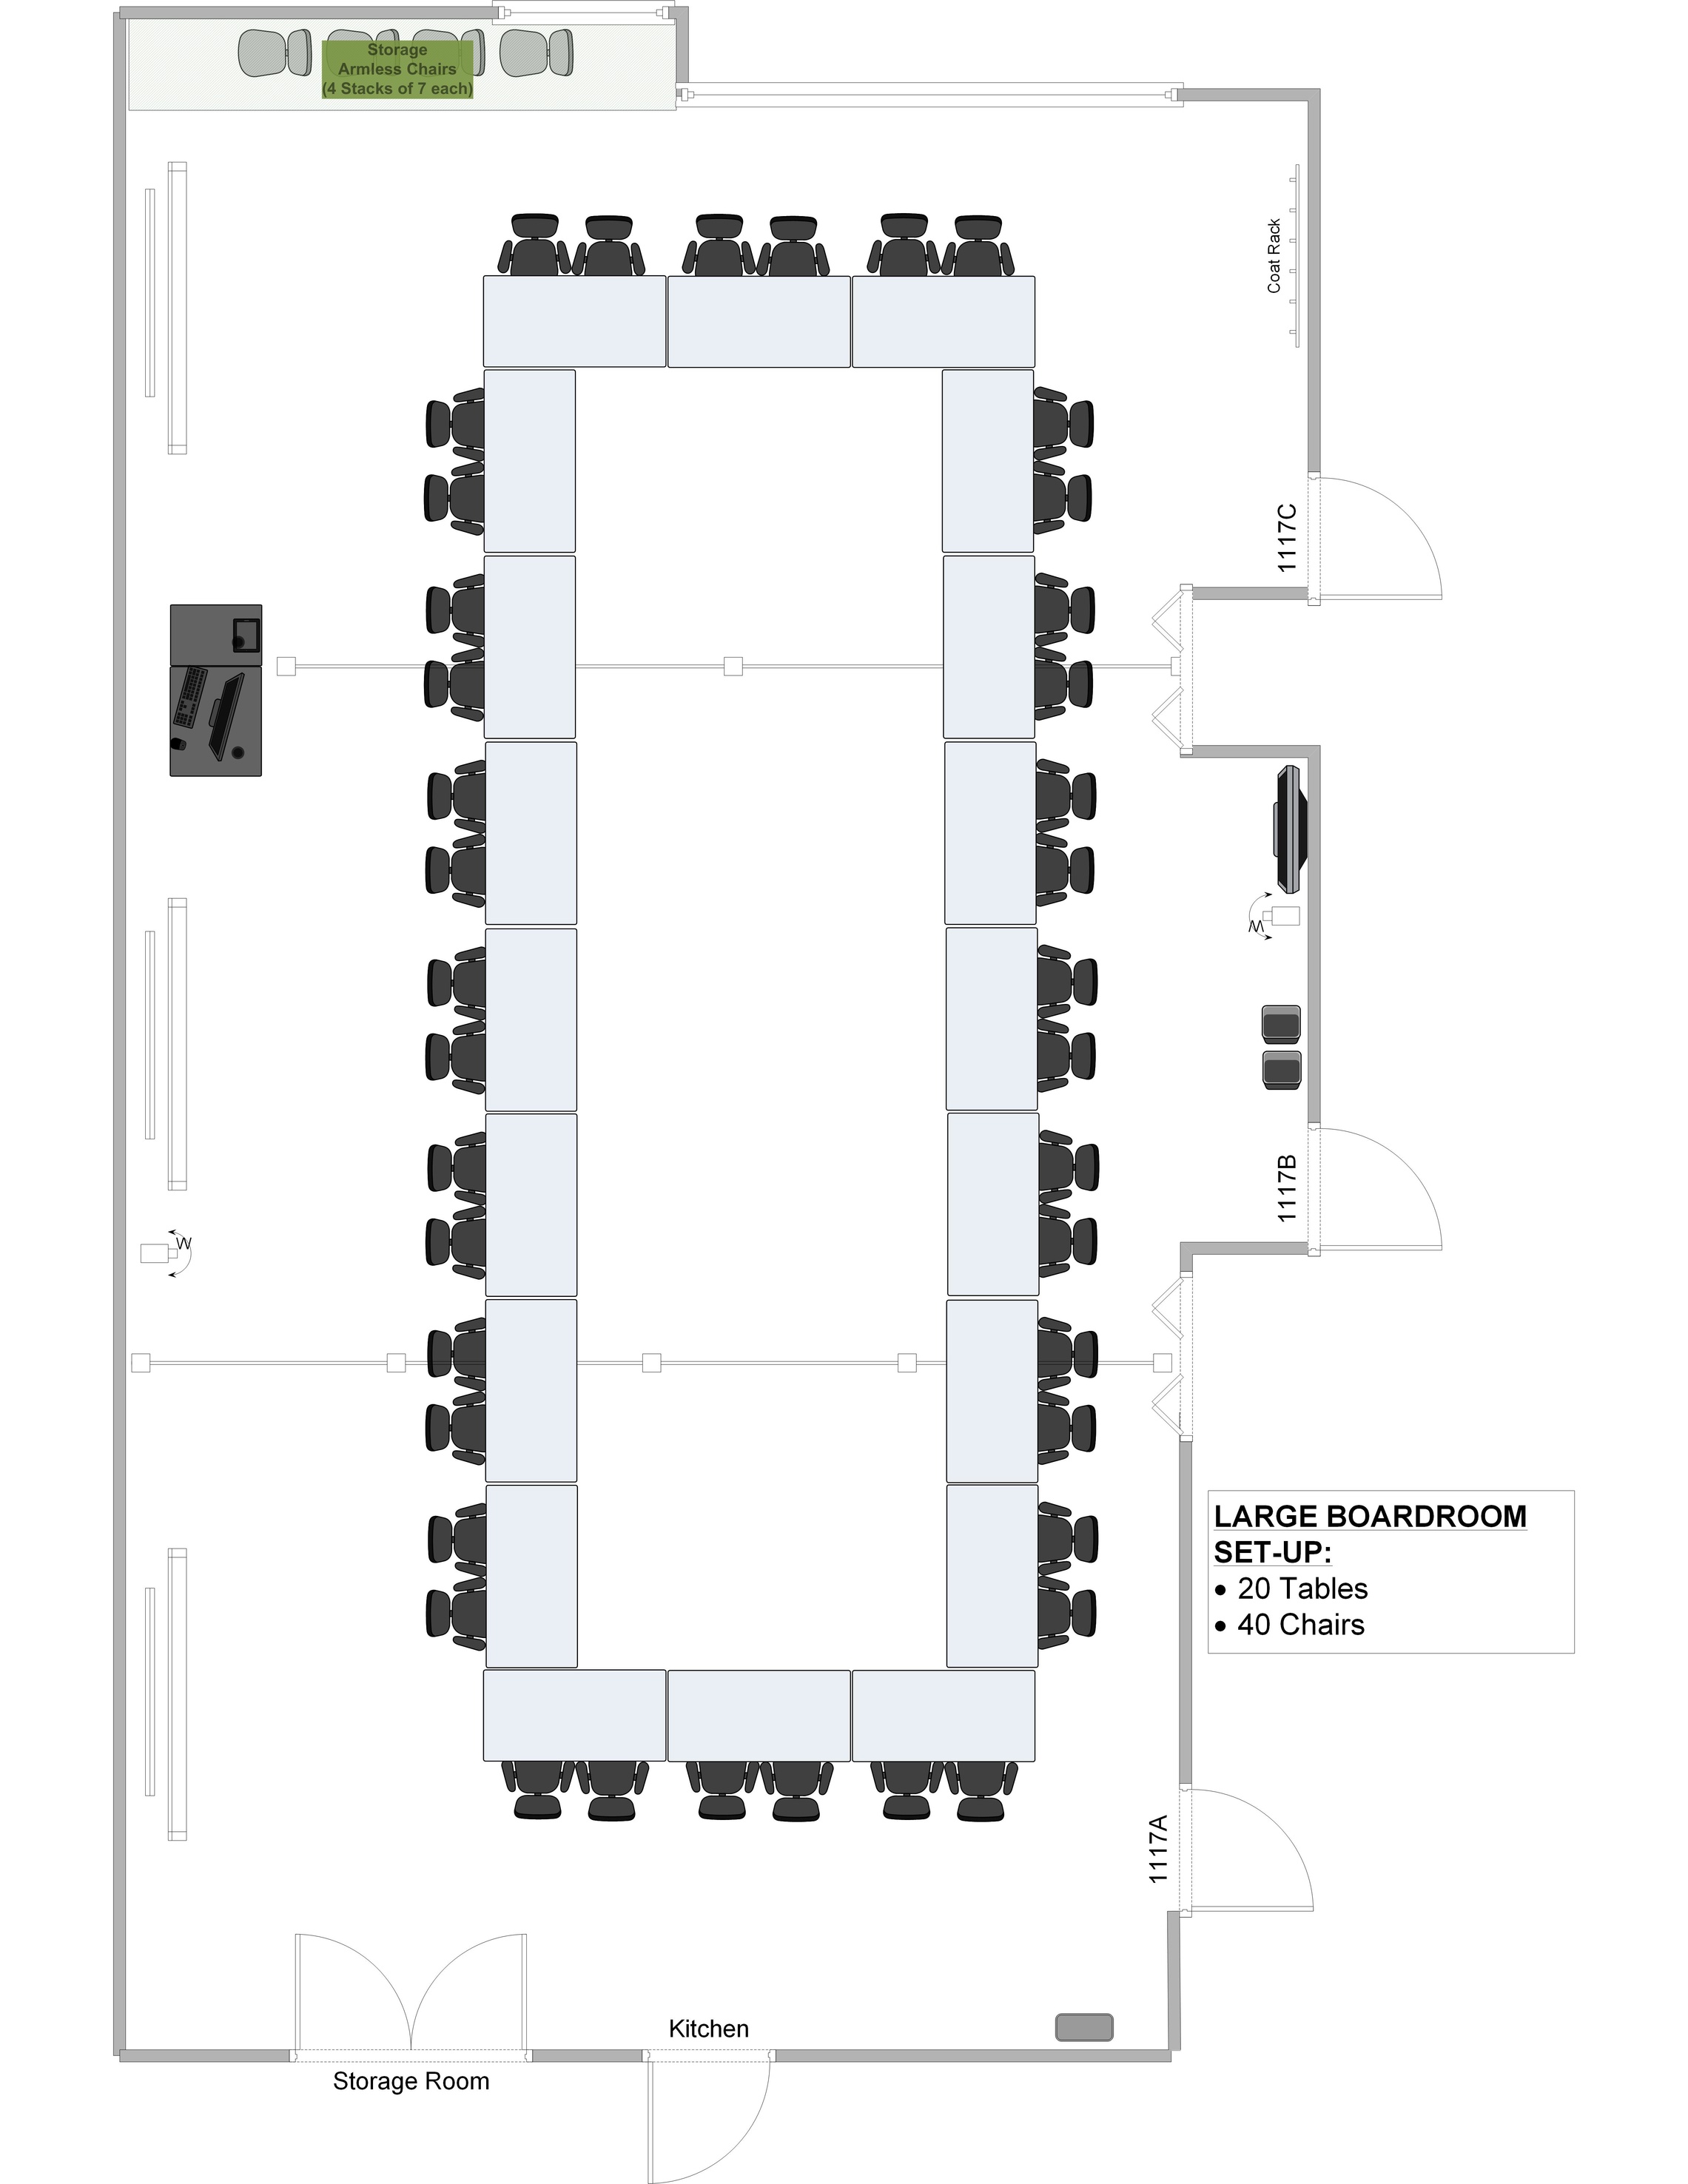
Large Group Layout
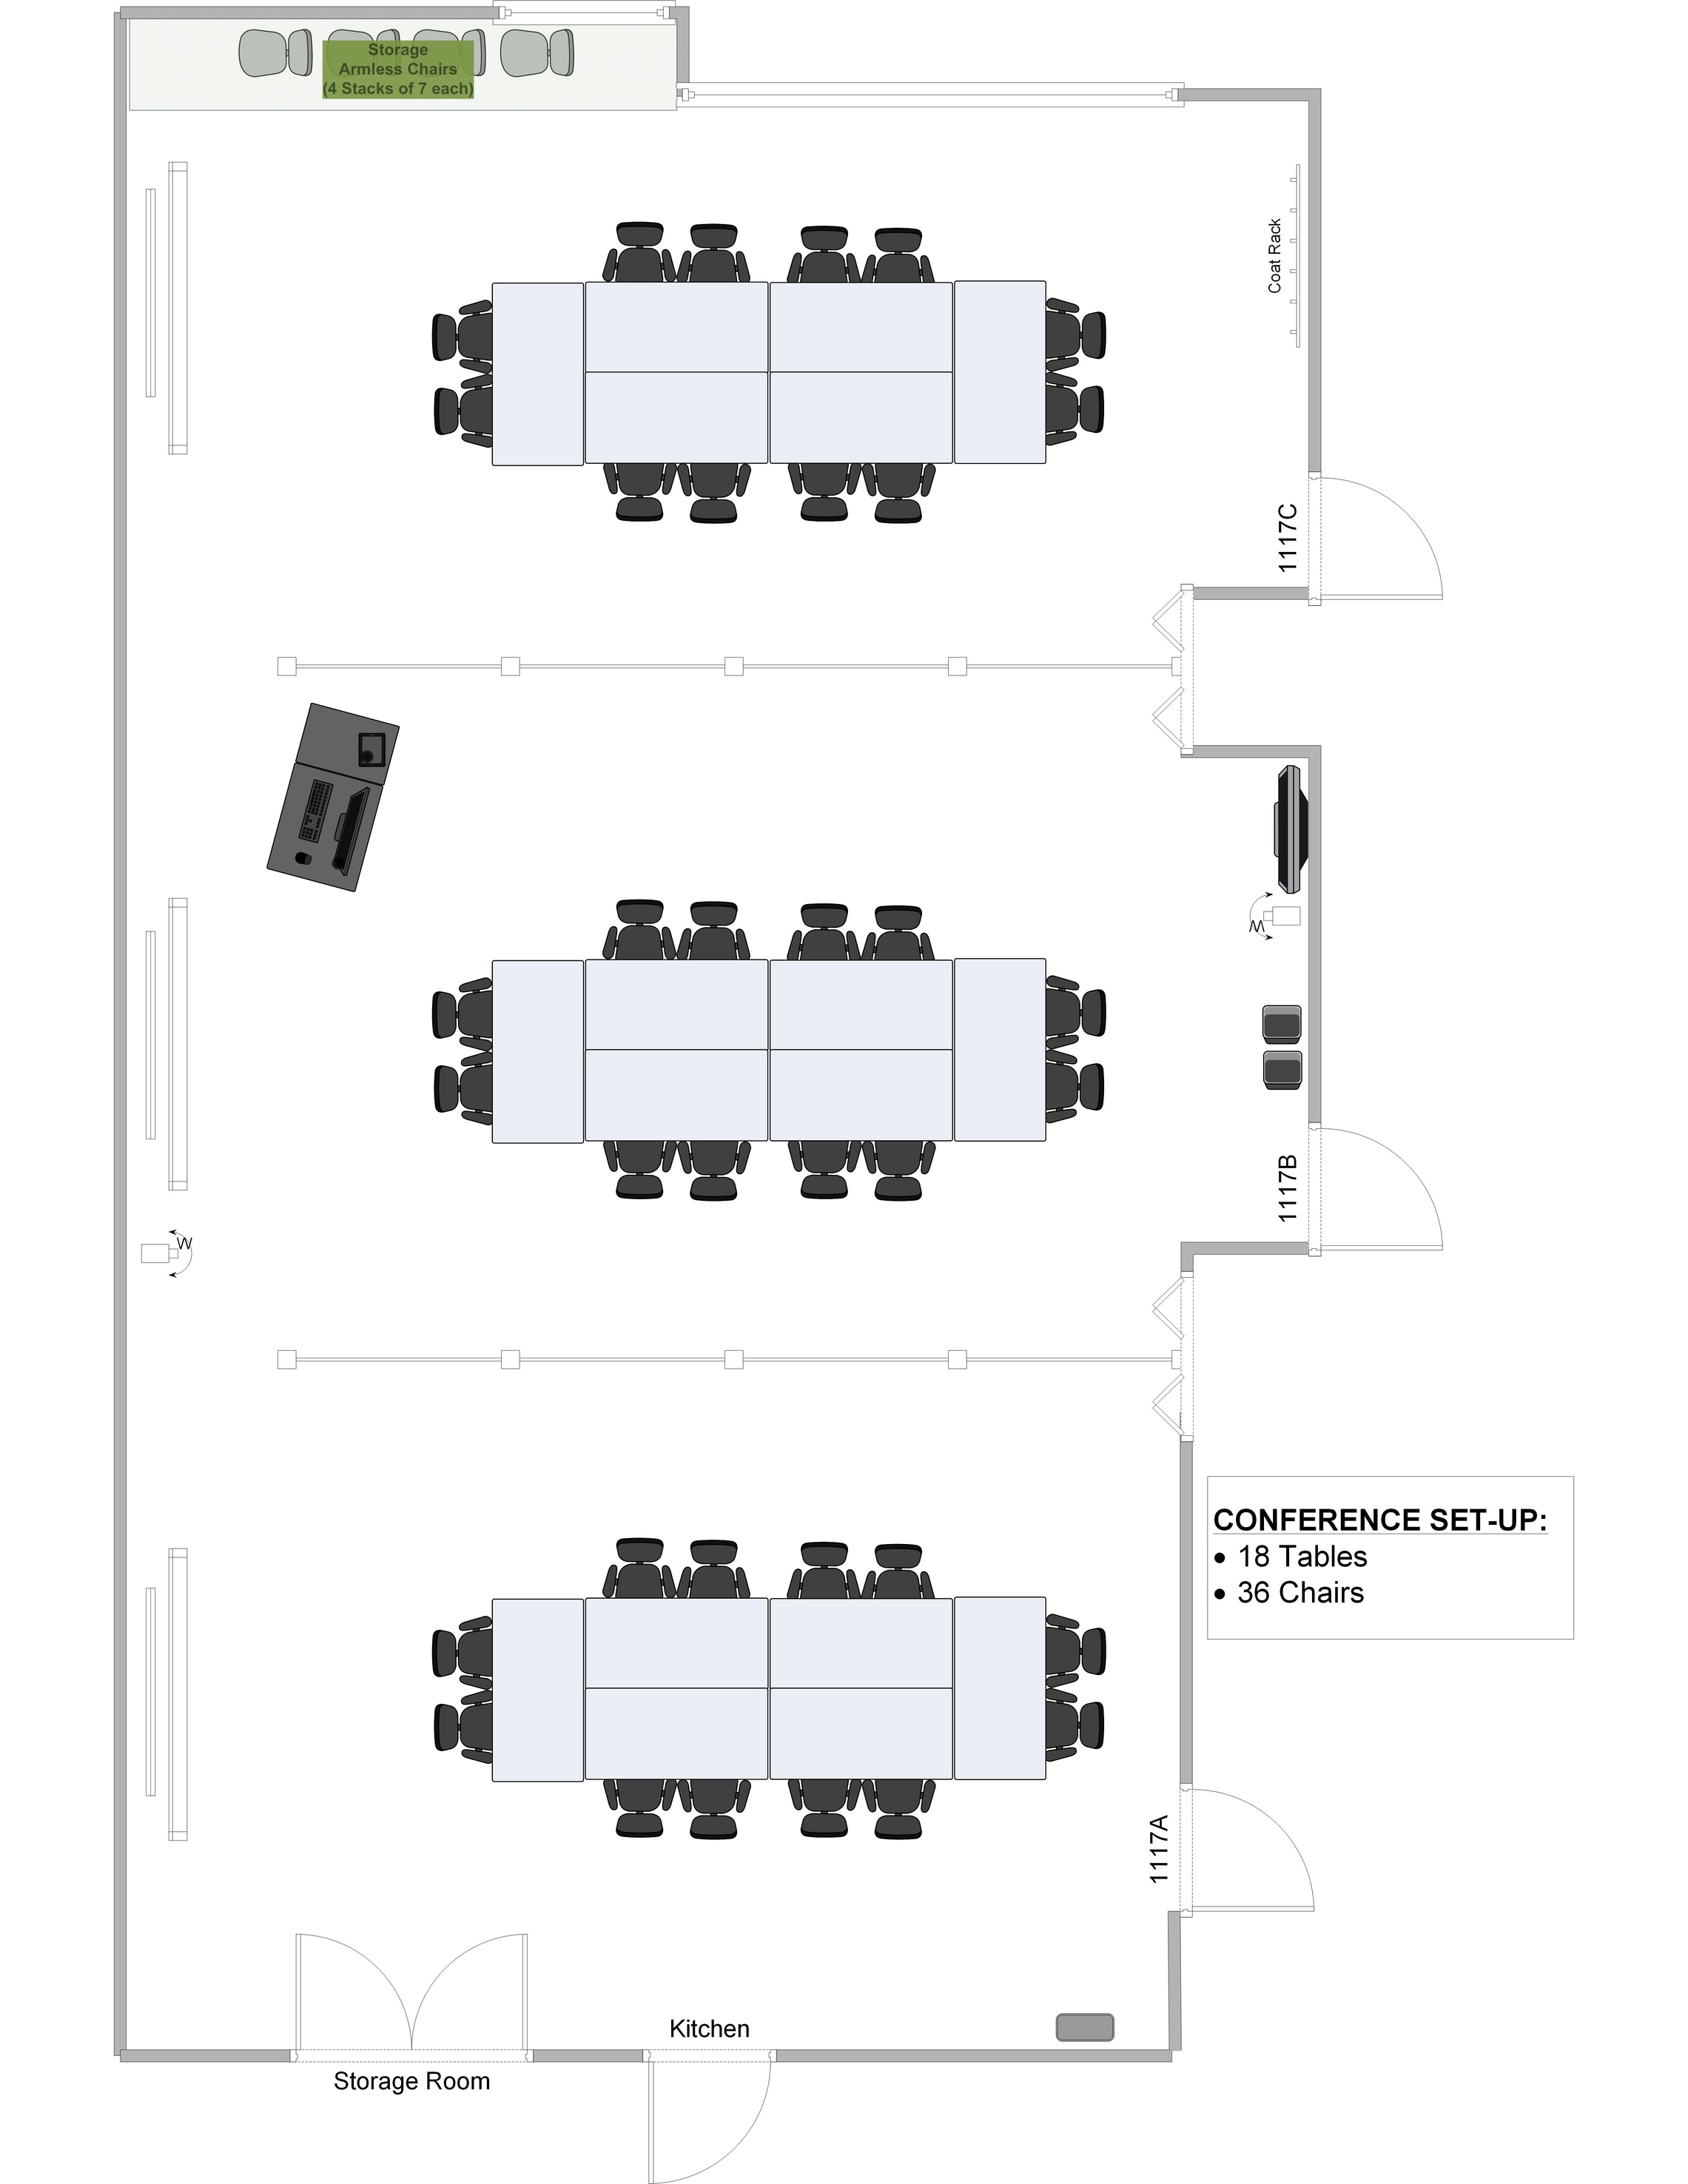
Conference Layout
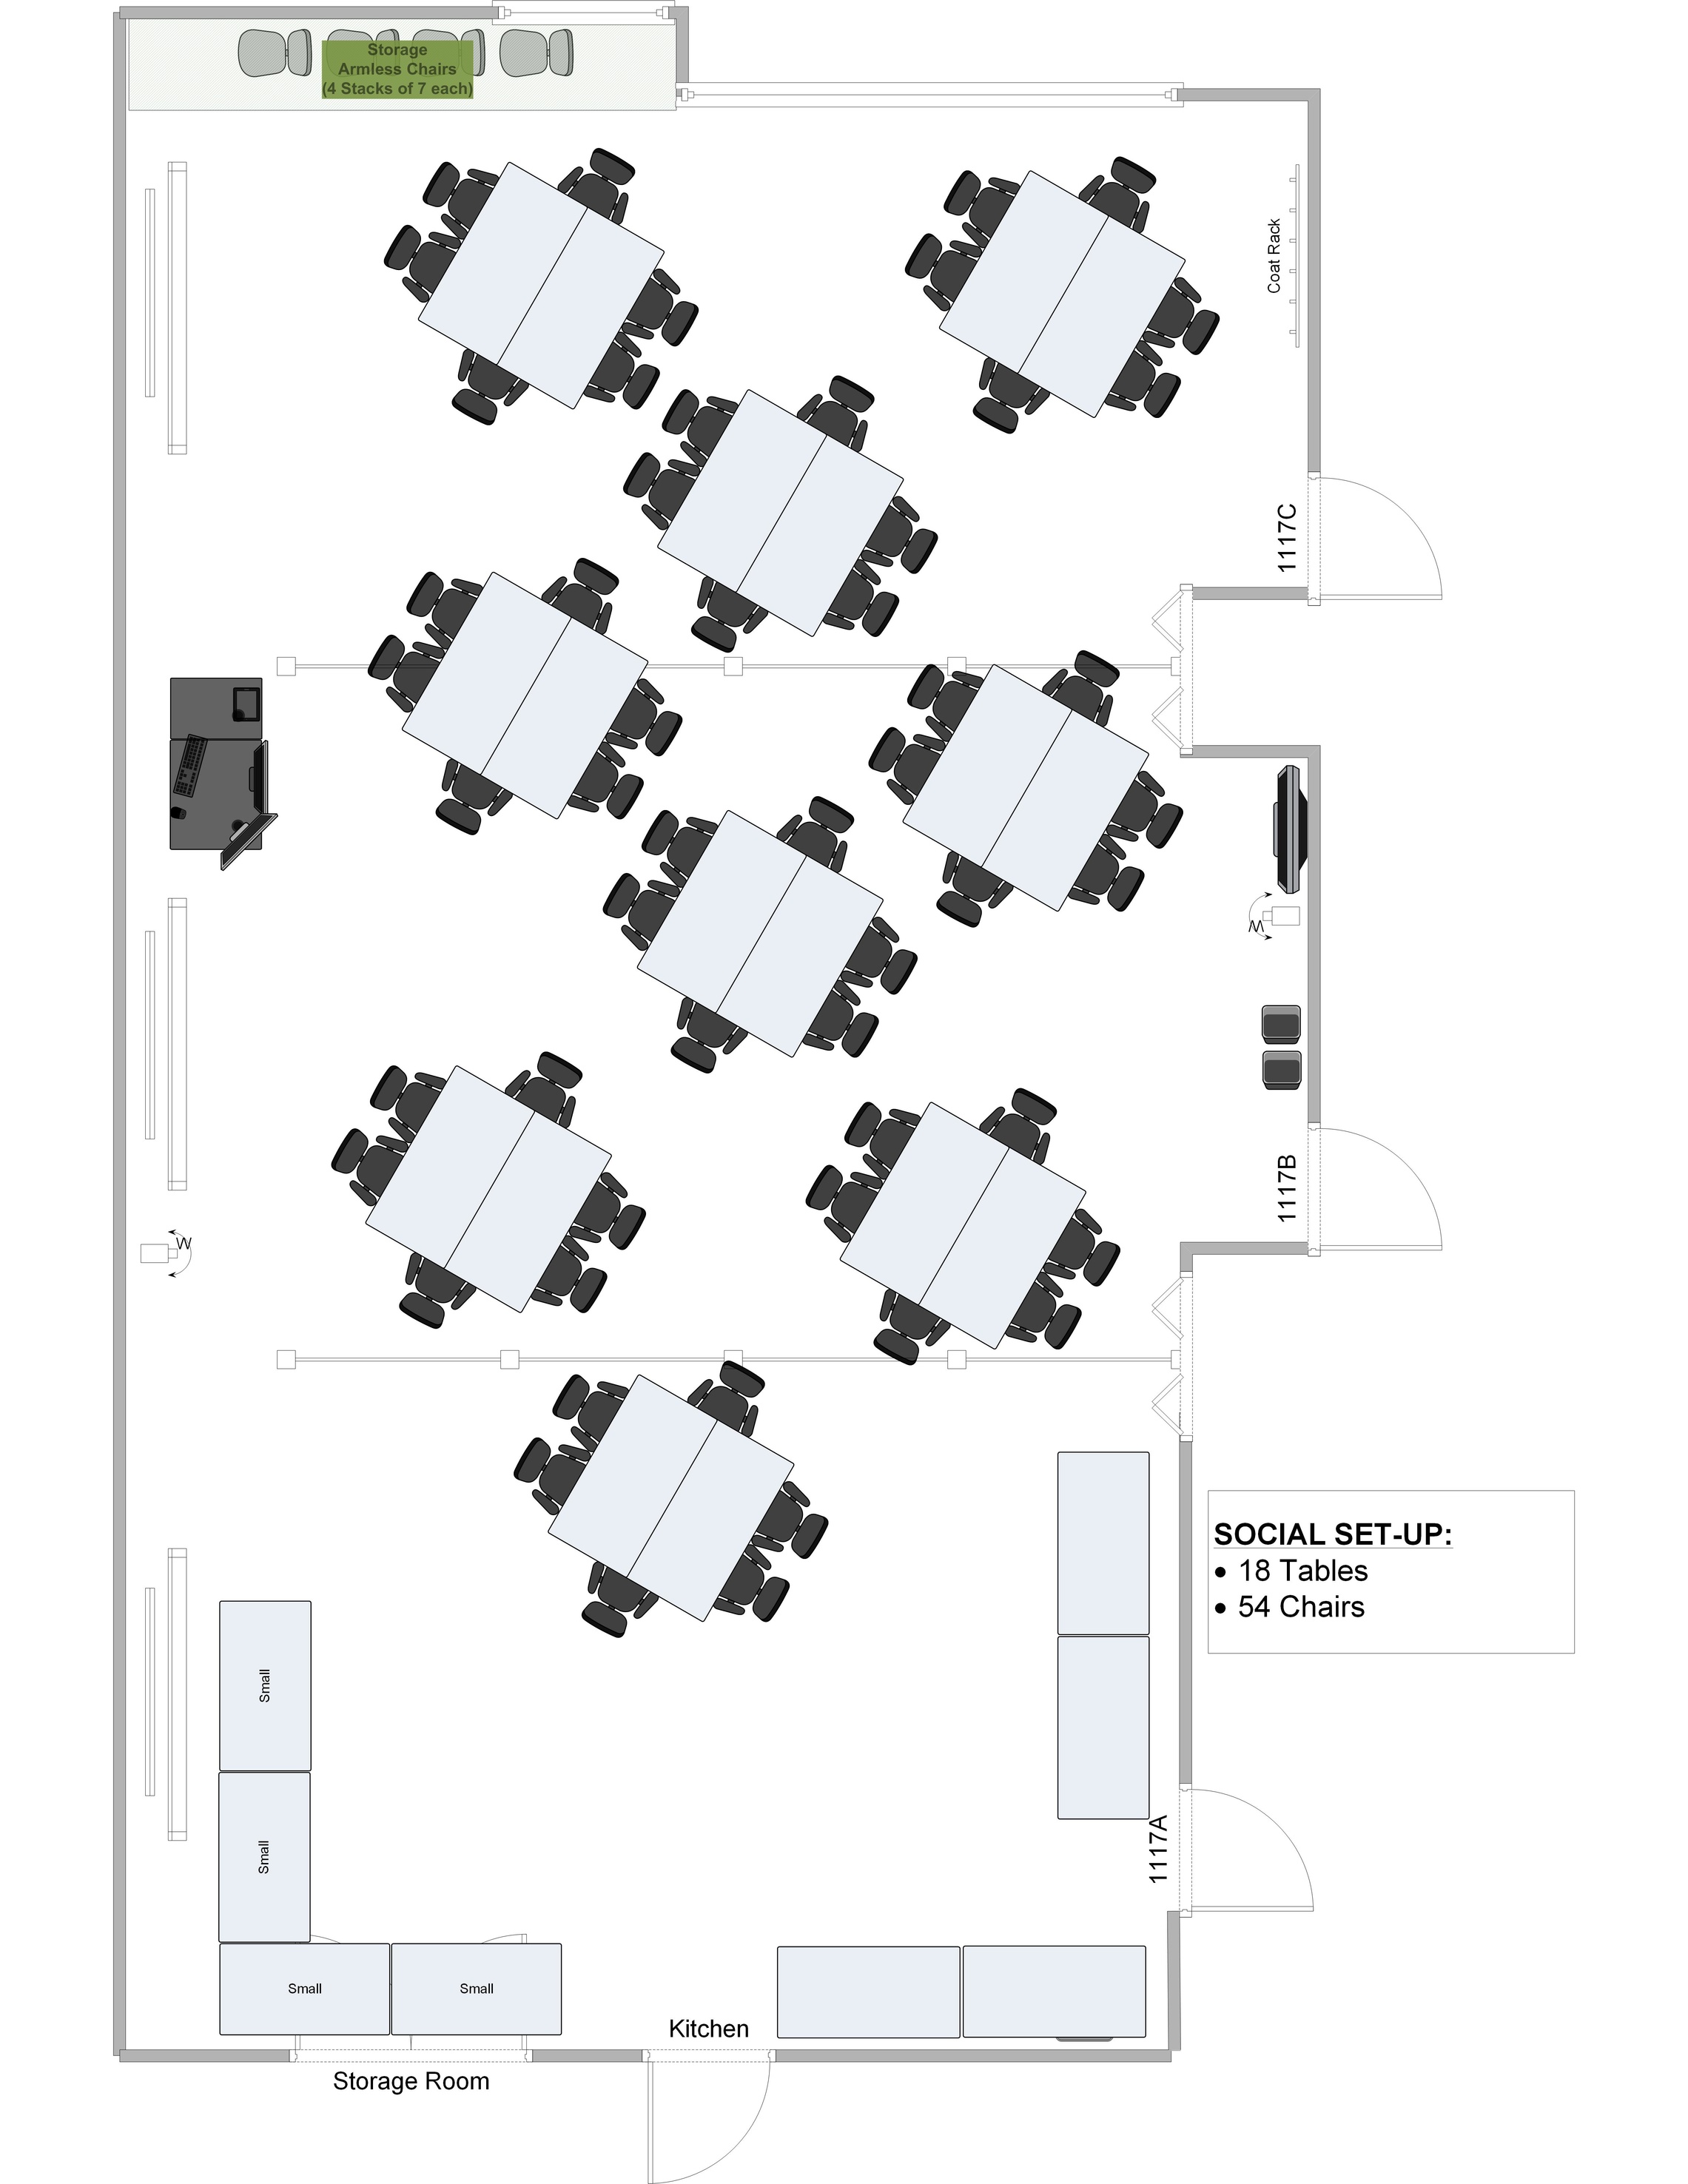
Social Event Layout
UCC 1117 Technology Guide
The AV set-up is similar to the standard for UI classrooms. The controls are on top of the lectern and will run on any or all of the projection screens. There are microphones in the labeled drawer that you just need to turn on and use – please don’t adjust any settings. DO NOT TURN OFF THE POWER SWITCH ON THE PODIUM – ONLY SHUT DOWN THE COMPUTER.
Technology included in the room:
- Windows PC with two screens
- Video conferencing for both presenter and audience view
- three projectors and screens
- one handheld wireless mic
- one handheld wired mic
- two lavalier (lav) mics
If technical problems arise, call 319-335-1976 (the Classroom Technology Services hotline). We only provide technical support during normal business hours (8 a.m. - 5 p.m., Monday - Friday).
UCC 1117 is equipped with an Extron digital touchscreen A/V Control Panel Interface.
- To start A/V system, touch lectern's Control Panel Interface screen and remember to shutdown system [press SYSTEM OFF button] when finished.
If you encounter an unresponsive A/V Control Panel Interface:
- check VIDEO MUTE button is not selected on A/V Control Panel Interface
- attempt to shutdown and restart A/V Control Panel Interface
- contact ITS Help Desk if A/V system remains unresponsive
See Control Panel Interface documentation for additional information.
UCC 1117 is equipped with a Dell Windows 10 Desktop Workstation Computer.
- A/V system will by default use PC [lectern computer's monitor] as its source/input
- Press the Space Bar on computer keyboard to wake main computer display, PC will be the default
- Log on with HawkID & password, and remember to log off when finished
If you cannot access computer’s login menu:
- check VIDEO MUTE button is not selected on A/V Control Panel Interface
- check computer monitor is powered ON
- make certain HDMI/Display Port cable is connected on back of monitor
- restart computer by pressing down Power Button on computer until it powers down, then press again to restart
- contact ITS Help Desk, if issue persists
UCC 1117 is equipped with a single lectern with dual computer monitors and three projectors/screens.
- By default, A/V system will use PC, the lectern computer's monitor set to the "primary" screen
- To view or project the "extended" screen, change the screen view on A/V Control Panel Interface
- To view or project an alternate source, such as MAC, AUX, or HDMI, select accordingly on A/V Control Panel Interface
If you encounter an unresponsive projector:
- check VIDEO MUTE button is not selected on A/V Control Panel Interface
- see Digital Imaging Projector documentation for additional information, and/or contact ITS Help Desk
See Dual Monitor-Triple Screen documentation for additional information.
UCC 1117 has one wired microphone available to use, found in the labeled drawer of the lectern. This microphone provides voice lift for the room and can be used to provide audio for virtual events too.
UCC 1117 has two options for wireless microphones, two lavaliere microphones to clip on to a users clothing and one hand held microphone, all found in the labeled drawer of the lectern.
- Wireless microphones provide audio input for both room's speakers, as well as lectern computer and its Zoom, UICapture/Panopto, and Skype for Business apps
- Switch/power wireless microphone ON
If you encounter non-working wireless microphone:
- check microphone info display for power or muting
- check microphone display info for potential battery replacement; rechargeable batteries are typically located on battery charger, alkaline batteries are typically located within microphone drawer
- if using rechargeable battery supplies, remember to replace depleted batteries on charger
- if nearing end of battery supplies, contact the IP front desk for additional supplies
- if correct audio input device is not available for lectern computer's apps, contact ITS Help Desk
See Wireless Microphone for additional details on the lavaliere and handheld microphones.
See Capturing Computer Video and Audio documentation for additional information.
UCC 1117 is equipped with in-room audio output from lectern computer through ceiling-mounted speakers and controlled via A/V Control Panel Interface.
- A/V Control Panel Interface contains touchscreen Volume Slider; drag Volume Slider up to increase volume, drag Volume Slider down to decrease volume
- Press Audio MUTE button on A/V Control Panel Interface to control audio muting
If you cannot produce in-room audio from lectern computer with the A/V system on and un-muted:
- ensure computer/device, app, or website audio is not muted
- increase computer/device, app, or website audio level, or increase A/V Control Panel Interface audio level
- select ExtronScalerD (Intel(R) Display Audio) as speaker or audio playback source in lectern computer's Zoom, Panopto, or Skype for Business apps
- check computer/device audio Settings: select ExtronScalerD (Intel(R) Display Audio) as lectern computer's audio output device or playback source
UCC 1117 is equipped with two external webcams mounted at the front and the back of the classroom.
- The webcams are located on flexible mounts and may be repositioned using the A/V Control Panel
If you encounter non-working Computer/Web-conferencing USB Camera:
- select the front or back webcam as camera input/source in lectern computer's Zoom, Panopto, or Skype for Business apps
- if correct camera input device is not available for lectern computer's apps, contact ITS Help Desk
See Capturing Computer Video and Audio documentation for additional information.
UCC 1117 is equipped with HDMI cables to display/project from a HDMI-capable personal device.
- To display/project HDMI-capable device, connect provided HDMI-cable on media lectern and/or booth to personal device's HDMI-port [HDMI-capable devices or HDMI-adapters are provided by user or department]
- Select HDMI or BOOTH HDMI [found under TOOLS menu] as display input/source on A/V Control Panel Interface
If you cannot produce in-room video and/or audio through HDMI with the A/V system on and un-muted, and HDMI or BOOTH HDMI [found under TOOLS menu] selected as input/source on A/V Control Panel Interface:
- increase A/V Control Panel Interface audio level
- toggle VIDEO MUTE and/or Audio MUTE button on A/V Control Panel Interface
- restart A/V system by pressing control panel SYSTEM OFF button, wait a minute, then press STARTUP again
- contact ITS Help Desk if issue persists
Note: not all HDMI-adapters may work well with every device and Extron A/V system; testing HDMI Personal Device Connection prior to intended use is highly recommended
See HDMI Personal Device Connection documentation for additional information. To connect a personal device to campus wireless network see UI Wireless eduroam Network documentation for additional information.
Hybrid events
To host a hybrid event via Zoom in UCC 1117, follow these steps:
- Set up a Zoom meeting or webinar and provide the link to join with those attending virtually.
- Log in to the computer in UCC 1117 under your own profile and subsequently, log in to Zoom on the computer.
- Open Zoom on the computer and start the meeting or webinar.
- Select to join computer audio when the pop up give a prompt.
- In the bottom left corner of Zoom, select the arrow next to the video icon to change the camera you use. You can only use one camera at a time.
- One camera is located at the front of the room and will broadcast the audience to whoever is joining virtually.
- The second camera is located at the back of the room and will broadcast the speaker to whoever is joining virtually.
- Camera view
- To change the angle of the camera placement, use the A/V Control Panel Interface
- Select the tab on the left of the interface that has a camera. Then toggle between front camera and back camera to select the one you're using and zoom in and out to your desired view.
- To change the angle of the camera placement, use the A/V Control Panel Interface
- Audio options
- You can choose to use the in ceiling microphones (small mics hanging around the room) to capture audio from the audience. You can also choose to use the handheld wireless microphone, wired microphone, or clip on lav mics. We recommend using the additional microphones to both broadcast audio to Zoom participants and to amplify voices in the room to those in attendance too. The in ceiling microphones do not amplify voices in the room but will broadcast to Zoom participants.
- If using the in ceiling microphones and Zoom participants can't hear, the mics may be muted. Look at the A/V Control Panel Interface that has a touchscreen volume slider and mute button. Make sure the audio is turned up and the mic is unmuted.
- You can choose to use the in ceiling microphones (small mics hanging around the room) to capture audio from the audience. You can also choose to use the handheld wireless microphone, wired microphone, or clip on lav mics. We recommend using the additional microphones to both broadcast audio to Zoom participants and to amplify voices in the room to those in attendance too. The in ceiling microphones do not amplify voices in the room but will broadcast to Zoom participants.
- Now that you're ready, make sure Zoom is displayed in the room on the screens by dragging the Zoom window to the corresponding screen being shown on the projectors, either the primary or the extended screen. You can choose which screen is projected on the A/V Control Panel Interface.
Need to share screen with Zoom participants AND show it to people in the room?
- Pull up on the computer whatever you need to show participants (PowerPoint, webpage, document, etc.). If a PowerPoint, start presenting the slides so those in the room can see the slides.
- Once those in the classroom can see the slides/pages/etc., then choose share screen via the Zoom application. Choose to share the screen that is being projected in the room (primary or extended). On Zoom, this should display as screen 1 or screen 2.
- Once sharing screen with Zoom participants, those on Zoom should see the presentation AND a camera view from the room too. If you want in room participants to see those on Zoom too, move the minimized Zoom camera view to the primary or extended screen, whichever is being projected in the room.
Zoom participant need to share screen so people on Zoom AND the room can see it?
- Make sure the Zoom participant has the ability to share screen using the arrow next to the share screen option on Zoom.
- Once they share screen those on Zoom should see the presentation AND a camera view from the room too.
- Now move the shared screen view to whatever screen is being projected in the room (primary or extended).
- If you want in room participants to see those on Zoom too, move the minimized Zoom camera view to the primary or extended screen, whichever is being projected in the room.